Thursday, July 30, 2009

$30 Off Sale Still Going On

Don't Miss Out on our Current Sale. Ends 08-15-2009 More details see site below.
Visit My Website

Tuesday, July 28, 2009

How Do I Replace My Microwave's Fuse?


How could something so small be so important? Very Important!

I had a customer call yesterday and ask how to replace their microwave's fuse. Good question! It's really rather simple. Now, a fuse doesn't break for no reason at all. There is usually another underlying problem but usually it is because of a power surge. So, keep that in mind when replacing your fuse that you may have another problem if this isn't a quick fix.

First you have to find the location of your fuse. Makes sense! They usually look like the one pictured above and range anywhere from one to two inches long. When purchasing you are looking for a "ceramic microwave fuse".

You will need to take off the cabinet or shell of your microwave with two screws. A simple screwdriver will work. Now, use your power cord as a guide and find your inner workings. You will probably see a computer or power board where you will see what is called a fuse holder.

Next, examine the fuse. If you have ever seen a blown fuse you will know exactly what this is, if not, you are looking for burned markings on the ceramic or white part of the fuse. You may also see melted parts or it may be solid black. You have to look for residue kinda like when a firecracker blows. If you have an ohmmeter go ahead and test it. If you come up with a zero you are good but any other numbers means you need a new fuse.

Next, simply purchase a replacement fuse and replace. Very simple. Now, put your microwave back together and give it a whirl! Heat a cup of water to test. Usually all is well, you now have a happy microwave ready to do some nuking!

Hope that helps, Food for thought,

ArchAngel

Monday, July 27, 2009

PREVENTATIVE MAINTENANCE


What exactly is Preventative Maintenance?

Well, you perform preventative maintenance on your car, right? Change the oil, other liquids, air up the tires, clean the undercarriage, and so on. Well, that is exactly what Preventative Maintenance for appliances is! We go through and check each individual part for proper functioning capacity by using a thorough checklist. By doing this, you can find problems early and fix them as well as simply keep your appliances running smoother for a longer period of time. It is important to do this. If you cannot give your appliances a little TLC yourself please call us and we can do that for you! Below you will find the checklist that we use when doing preventative maintenance for you. Here are our prices: Any 1 Appliance $39.95, Any 3 Appliances $99.95, Any 3 Appliances Twice Yearly $175.00- schedule your appointments in advance.
Blessings and Food for thought,
ArchAngel


ARCHANGEL APPLIANCE REPAIR SERVICE
HOME, KITCHEN, LAUNDRY APPLIANCES
Copyright ArchAngel Appliance Repair 2009

PREVENTATIVE MAINTENANCE CHECKLISTS:

  • REFRIGERATOR/ FREEZER
” Clean condenser.
” Check and properly adjust thermostat and air dampers.
” Check automatic defrost cycle.
” Check door seals for air leaks.
” Clean defrost evaporation pan.
” Check defrost drain for blockage and leaks.
” Level cabinet.
” Check ice dispenser (if applicable) for proper operation.
” Check water dispenser (if applicable) for proper water flow.
” Inspect electrical system.

  • DISHWASHER
” Check pump and motor shaft for leaks.
” Clean pump and spray arms. Check water distribution.
” Check and clean dispenser operation.
” Check heating element.
” Ensure correct amount of water enters the dishwasher.
” Check door gasket to prevent leaks.
” Level dishwasher as needed.
” Inspect electrical system.

  • RANGE
” Inspect electrical system for proper ground and secure connections.
” Visually check readily accessible wiring insulation for cracks or peeling.
” Heat check oven controls for accurate temperatures.
” Check oven door and door gasket for proper alignment.
” Level range as needed.
” Check and adjust clock/timer as needed.
” Test self-cleaning lock mechanism.
” Check electronic controls to ensure proper functions.
” Check surface/oven burners/ elements.
” Test gas line and connections for leaks.
” Check warming drawer operation and alignment.


  • MICROWAVE OVENS
” Check door seal for microwave leakage.
” Check door interlock system.
” Inspect electrical systems for proper ground and secure connections.
” Check cooking power output and probe temperatures.
” Visually check readily accessible wiring insulation for cracks or peeling.
” Check interior of oven for damage to finish or plastic parts.
” Check electronic control functions.
” Adjust clock as needed.
” Inspect grease/air filter.

  • WASHING MACHINES
” Check fill cycle and water temperature for wash settings.
” Ensure correct pump out and spin cycles.
” Check for excessive noise and vibration during spin cycle.
” Check timer for correct operation.
” Inspect belt for wear and adjust tension (belt drive washers).
” Check clutch adjustment and spin speed.
” Inspect electrical system for proper ground and secure connections.
” Check tub and hoses for leaks.
” Check drain pipe or laundry tub.
” Inspect motor coupling for wear.
” Check level of machine.
” Check fill and drain hoses for proper connection.
” Check air dome for debris and pressure hose for secure fit at pressure switch.

  • DRYERS
” Check the rear drum seal.
” Check the drum belt, idler pulley and support rollers for wear.
” Check exhaust system for leaks.
” Cycle check the burner for proper ground and secure connections.
” Inspect electrical systems for proper ground and secure connections.
” Check thermostat temperatures.
” Check time for correct cycle operation.
” Check gas line and connections for leaks.
” Check machine component functions by operating dryer through short cycle.
” Check level of machine.
” Clean dryer.

Monday, July 20, 2009

What Brands of Appliances Do You Service?

We had a customer email us and ask what brands of appliances do we service. We service the brands below and more if you ever have a question feel free to call and ask:
–GE™
–Roper™
–Magic Chef™
–Maytag™
–Tappan™
–Frigidaire™
–Hotpoint™
–JennAire™
-Amana™
-Electrolux™
-Admiral™
-Fisher-Paykel™
–Kenmore™
–Whirlpool™
and more...


Second, we had a customer call and ask us if we service commercial appliances. We usually do not service commercial appliances. Here again, please phone and ask to be sure.

Thanks and as always,
Food for thought,
ArchAngel

Forum Question: Amana Refrigerator


Below you will find a question from an online visitor to our forums on our website http://www.archangelappliancerepair.com . If you have any questions feel free to register and post as well. A Free Service. Also feel free to post a tidbit about your business. Blessings- ArchAngel

Question:
I have an Amana side by side with a vent that flows from the freezer to a "chiller compartment" in the door. The refrigerator door was left ajar for about a 24 hour period, and the items in the freezer defrosted in addition to the refrigerator being not able to cool. We salvaged the food that we could, and made sure the door was closed tight. We were surprised that it did not "recover", so inspected it more closely and found that the coils were frozen in the freezer. We took a hair dryer and blew them until the fan kicked on and cool air began to blow. We have done this numerous times, but it keeps freezing back over. I thought maybe I was not defrosting this enough, so I unplugged the refrigerator for 5 days, then plugged it back in, but the same results. I cannot keep cold items in the fridge, only what we need, and I am blow drying the coils every few hours. We do not have the money for a repairman, and we live far from you (on the NC/TN border). If you could give me any advice so that we can repair it, I would be more than happy to send you a consulting gratuity. Thank you so much for your time!
BZMommy
----------------------------------------------------------------------------------
Response: Can you give me the make, model and serial number?

This way I can look up the part numbers and price for you.

If you have an ohm meter you can check the necessary parts.

I think you need either the defrost heater or defrost thermostat but without being there I can't say for sure. You are gonna need to test them both using an ohm meter. Do you know how to use one? --Here are some quick directions

look on Sears' website under their parts section and use your model number to look up a diagram of your inner workings or look at your buyer's manual if you still have it.

1. Find your defrost heater and defrost thermostat on the diagram.
2. Make sure the whole unit is unplugged. Warning!
3. Remove the back panel from the freezer side and inspect for faults/ ie burnt evidence on the defrost heater and or thermostat.
4. Disconnect the wires to the heater.
5. Do this also with the defrost thermostat wires as well.
6. Then ohm them out. --Put one lead to one side of the heater and one lead to the other side and then do the same for the thermostat.
7. If you get an O.L either time then that is your problem. If you get numbers, you are good to go. - Called Ohming it out.


It is less likely that you would need a defrost timer. This would be the last resort but these rarely go bad.


Best bet is if you don't want to purchase a new refrigerator which I think is important, no appliances in landfills, then just replace them both. It is usually always one or the other.

Just make sure to get out your buyer's manual or go to that Sears site and get a diagram. Parts go on just like they come off. If you are easily forgetful, get someone to video you taking it off. That way if you lose your way you can refresh your memory. I personally would suggest even though you are having a tough time financially right now to go ahead and call a repairman to help you. That way, you get at least a 90 day warranty usually on parts and labor. If you aren't careful you can pierce a hole in something/ ie the coil... and then you have a whole other can of worms and are best buying a whole new fridge price wise. It shouldn't cost you more than $90 bucks for someone to come out and help you.... We called everyone round here and that is the low to medium price and what we flat rate for. Call around to the folks in your town and see what their prices are, and parts. I can give you the parts price here and you can let them know ahead you know that much. That way you don't get taken advantage of.


If you do decide to fix it yourself, as always, read our disclaimer on our homepage. I hope that helped and thanks so much for your question! Too bad you live so far, for folks having trouble financially we don't mind trading a chicken or something from time to time... smile We have 7 children, not all live with us all the time, but we get that times are tough. We are just riding out the tide as well. The Lord always takes care of us....


And if you can't get it fixed, and have to buy a new one, please please recycle your old fridge.

Blessings

ArchAngel
-------------------------------------------------------------------------------

Response: Thank you so much for your response. I'm not sure of the make, but the serial number is 9903115320, the model number is srd23vw, and the mfg number is p1315306ww. Hopefully this is enough info. We do not have an ohm meter, but I think I can borrow one.

I'm very grateful for your assistance. We also have discovered over the years that the Lord always provides what we need when we need it.
BZMommy
-----------------------------------------------------------------------

Response: Ok, I didn't forget ya, just been busy.... which is good, but....

so, here goes

part number description price
12017823 Substitution: R0161088 Thermostat 34.45
12049801 Defrost Heater/ Evaporator 30.31
10530703 Defrost timer 32.12- this is the one that is likely NOT the prob but if they other two don't work, try this.


That should do it and also get you more life out of the fridge.

Now, my program for looking up parts with our product distributor was down tonight... scheduled maintenance. These prices are from Sears.com here is the link

http://www.searspartsdirect.com/partsdirect/getSubComp.pd?modelNumber=SRD23VW-P1315306WW&productCategoryId=0165000&brandId=1268&modelName=SIDE-BY-SIDE-REFRIGERATOR&diagramPageId=00008&componentDescription=DRAIN/ROLLERS/EVAP&documentId=P9080173&backToLink=Return%20to%20Sub%20Components%20list


We prefer G&E Parts out of Spartanburg. They are great. number is 18002268989


Sears has the diagrams yall need to know what you are doing if you are gonna wing this.

I wish yall were closer, would help you out. Let me know how it goes.


Many blessings to you!

ArchAngel


--

Thanks kindly for your questions and posts!

"Get Plugged In"

"A Word & A Prayer Above the Rest"

ArchAngel Appliance Repair

Monday, July 13, 2009

Safe Environmentally Friendly -Gas Appliances Tips


We can safely install/ hook up your gas appliances... ranges, dryers and gas logs oh my!
The house above did not have a correct installation of their gas stove! We don't want that for you!
Gas appliances are environmentally friendly and safe to use.
These are possibly some of the most technical need based appliances to install or repair and therefore we never recommend you do it yourself. We have written below some tips on purchasing gas appliances and necessary knowledge on installation. We also have a few environmental tips. I hope this helps you in your decision to not only buy but to GO GREEN!
Food for thought,
ArchAngel


GAS RANGES
  • To install a gas range in your home, you will need a gas hookup, either to a natural gas source or to a liquid propane (LP) supply tank and a 120-volt household electric circuit for running appliance features including the clock and lights, and the electronic ignition.
  • Gas ranges allow you to use different levels of heat almost instantly. The burners stop retaining heat quickly so the cooking is stopped faster as well when you turn the burners off. They use precise temperature controls as well.
  • If you are shopping for a gas range make sure to purchase one with an electronic ignition that automatically lights your burners.
  • You can purchase a range with special features like high output quick heat for searing or you can get burners that hold more steady heat for simmering. You can also purchase burners that are sealed making it easier to clean them. They also prevent food from getting stuck under them.
  • Gas ranges usually cost more than electric ranges but the environmentally friendly aspect and lower costs outway this. Propane gas is cleaner burning than coal, heating oil or gasoline, and it often costs less than these fuels or electricity. Propane combustion does not emit large amounts of carbon dioxide and produces no sulfur dioxide or particulates - primary causes of the greenhouse effect and acid rain. In fact, using propane instead of electricity produced by coal-fired plants can reduce the carbon dioxide emissions attributable to heating a home by as much as 75%!
  • Electric stoves use less energy but cost more to operate. Stoves that rely on natural gas have an added benefit: natural gas emits only half the carbon of coal, none of the sulfur, and less nitrogen.

INDUCTION COOKTOPS
  • Another option is purchasing an induction cooktop. Induction cooking uses 90% of the energy produced compared to only 40% for a gas burner and 50% for traditional electric ranges. Induction cooking is based on magnetic fields: each 'element' or induction coil generates a magnetic field that induces heat into steel cookware placed on top of it. Induction cooktops have the same instant control as gas and are the fastest of all cooktop types to heat and cook food. The first time I saw one of these I thought I had been dropped into a sci-fi movie! They are truly amazing and wonderfully environmentally friendly.
  • No open flame
  • Excellent for cooking, warming or reheating
  • Cool to the touch
  • Modern breakthrough
  • Multiple uses
  • Great for commercial cooking stations
  • No gas fume or flame danger
DRYERS

  • Insist on a moisture sensor for dryers. Most dryers you purchase now have a sensor that automatically stops the cycle when your laundry is dry. They sense the moisture levels and do not overdry which saves energy. This also protects your clothing from being overdried and therefore shrinking it.
  • Purchase a gas dryer because they perform just as good as an electric dryer but they are cheaper to run and also have a less harsh impact on our environment. They put off on average 40% less carbon dioxide than an electric dryer does. They cost more initially but their operating cost is so much lower that they pay for themselves in a year or two based on usage.
  • Most commercial companies use gas dryers... for instance hotels, inns, and restaurants. If commercial businesses choose natural gas, don’t you think you should too?

GAS LOGS
Natural gas fireplaces fit today's lifestyles:
  • Natural gas units reduce by up to 99% the amount of pollutants and particles emitted into the air.
  • Instant ON/OFF operation. Flip a switch or touch a remote control.
  • Continuous fuel supply.
  • No soot, no ashes, no messy clean-up, no creosote buildup in your chimney, no chimney fires.
  • Using natural gas logs or fireplaces can cost as little as 25% of the cost of burning wood.
  • Most operate independently of electric power, providing an auxiliary home heating source during power outages.
WATER HEATERS
  • A natural gas tank-type water heater uses about 29% less energy than an electric water heater. And, a natural gas water heater emits about 2,856 pounds of carbon dioxide (CO2) annually versus electric water heating which emits about 6,509 pounds of CO2. Yes, a gas water heater emits 2.3 times less CO2 than an electric water heater.


ENERGY COSTS OF VARIOUS COOKING METHODS
Appliance Temp. Time Energy Cost
Electric oven 350 F 1 hr 2.0 kWh 16c
Convection oven (elec) 325 F 45 min 1.39 kWh 11c
Gas oven 350 F 1 hr 1.12 kWh 7c
Frying pan 420 F 1 hr .9 kWh 7c
Toaster oven 425 F 50 min .95 kWh 6c
Crockpot 200 F 7 hr .7 kWh 6c
Microwave oven "High" 15 min .36 kWh 3c
* Source: Consumer Guide to Home Energy Savings


Friday, July 10, 2009

DIY Change a Dryer Element


We had a question on our forums which asked how to change the heating element on a dryer. This is something I don't usually recommend folks doing themselves, but am going to post the DIY info here anyways. As always, read our disclaimer on DIY repairs. I wrote this as simple as I can and hope it is understandable. *Also, keep in mind this is a repair once you know that the heating element is your issue and not your thermostat, or the timer or temperature switch. Now this is why I don't suggest doing this yourself....I always recommend changing out each of these because when one goes they all tend to go and why open up your dryer and take time only to find out your have to do it all again, or have me come out all again. Easier to fix it all at once, but since the question was for just the element, here goes....Questions, give me a ring! 828-693-7905

Food for thought,
ArchAngel
  • ALWAYS unplug the unit before ever beginning a repair. I know, I know, basic. But, this is the way folks get fried! -You must first find the dryer heating element cabinet. Most are located in the back but a few are located in the front. If you didn't keep your owner's manual... then I suggest going to Sears website and looking at a diagram of your specific dryer. You can look at their parts/ model number page to do so. I detailed in a prior post how to do this, mainly you need your model number and if you are internet savvy this is an easy process. Their prices on parts is high, but the diagrams help if you don't have prior knowledge. This is the most important step though. YOU MUST look at a diagram because different dryers have different types of elements. You don't want to go in and take a part off you don't need to be taking off. I have gone to so many houses where folks have taken things apart and ended up not knowing how to get it back together! Funny for me, not for them!
  • First you have to determine if screws or clips are holding your compartment shut. Remove these and then you will see the heating element and wires. Use your needle nose pliers to slowly remove the element wires.
  • Next you might see a oblong can like shaped piece that might be covering your heating element. If so, lean it backwards taking off the hooks holding it in place.Detach the can shaped object that may cover the heating element. Tip the can backward to slip it off the hooks holding it in place. If you don't see this you have a dryer that has easier access.
  • Next you are gonna take out the screws holding your actual heating element. Go ahead and pull it out.
  • Replace it with your new heating element and return the screws in place. Make double sure it is secured in your dryer. If you took off a cover/ the oblong shaped piece, put the back as well too. And then you can reconnect the wires you took off in the first place. You now replace the cabinet cover.
  • Ok, now let's check your work! Turn your dryer on the cycle with no heat.... run outside and see if there is air coming out of your vent. Now, turn on a cycle with heat and do the same. You should see a difference in temp.
  • Last, I recommend breaking your new element in by running the dryer with no clothes for at least one cycle. Yes, this wastes electricity which we are not a huge fan of, but this takes off any oily residue that was on your element and will keep your clothes from smelling. Not good! Fresh clothes a Must!
A last tip is this: NEVER EVER EVER EVER EVER use those little dryer sheets for softening!
This is the absolute fastest way to slowly kill your dryer.... losing life and time it can perform for you.
The dryer sheet chemicals slowly erode the components. These just aren't good at all. If you want to use softener opt for the liquid kinds. Just a little tip from me to you!

NEW FORUMS FOR APPLIANCE QUESTIONS


I just wanted to let everyone know you can post questions about your appliances at our new forums on our website... DIY Advice, Buying Advice, Cleaning and Maintenance, whatever you can think of pertaining to appliances!

We also write/populate a blog on the Times News online website. If you post a question, I Will use it on the blog as well, so when posting if you don't want your private name used simply use an alias/avatar. We will delete spam or negative posts.

We give 50% off to religious organizations, they must simply qualify as a nonprofit org. and to their leadership/ staff homes.

Lastly, We also want local businesses to join and post something about your business on our forum under the business networking category. We want to hear about your business and services. In this economy we all need to work together. -We also don't mind putting a link to your business on our links page just let us know you would like this. (family friendly)

Just go to Visit My Forums to visit the forums. And be sure to read our blog daily on the Times News Blogs at www.blueridgenow.com. Thank you!

Join and Register today! Let's get blogging/ posting!
Joe Young- ArchAngel Appliance Repair Smiler

Thursday, July 9, 2009

"Green" Earth Friendly Cleaning Tips


Here at ArchAngel we take the Environment and the beautiful world we live in Seriously! My wife has been slowly going Green in our home and I've been learning from her but I thought to do my own research and see just what is going on. So, here are some Earth Friendly and "Green" cleaning tips I found and am passing on to you! First, here are some STAGGERING numbers to peruse: Did you know?............
  • 17,000: the number of petrochemicals available for home use, only 30 percent of which have been tested for exposure to human health and the environment.

  • 63: the number of synthetic chemical products found in the average American home, translating to roughly 10 gallons of harmful chemicals.
  • 100: the number of times higher that indoor air pollution levels can be above outdoor air pollution levels, according to US EPA estimates.

  • 275: the number of active ingredients in antimicrobials that the EPA classifies as pesticides because they are designed to kill microbes.

  • 5 billion: the number of pounds of chemicals that the institutional cleaning industry uses each year.

  • 23: the average gallons of chemicals (that's 87 liters) that a janitor uses each year, 25 percent of which are hazardous. statistics found at http://planetgreen.discovery.com/go-green/green-cleaning/green-cleaning-statistics.html
Ok, after doing research to write today's blog and reading not only these numbers above but many more, I have to say I am flabbergasted! Apparently my first knowledge of the cleaners we use being toxic is an understatement. So, here are some tips to get you going on your Summer Green Cleaning!

To begin with and this may upset some folks but you will want to stop using most air fresheners, oven cleaners and other products which employ spraying into the air unless you do your homework and know that they are all natural. This is the quickest way to
begin getting Green.

You next want to start the
"Substitution Process". Method, Seventh Generation and Simple Green all make Earth Friendly products which we don't mind recommending. We actually use some of the Seventh Generation products in our home. Also, Clorox is making a new product line titled Green Works. You can get this at your local grocer. We tried several and were not as pleased with them as the Seventh Generation, leaves a little residue, but the smell is delightful and the price favorable. If you would prefer not using products you can make your own home cleaners easily. This is both fun if you have kids to do together and it saves quite a bit of money as well.
  1. Surfaces: You can clean kitchen & bath surfaces and walls with hot water, baking soda and a tad of dish soap.
  2. Floors: Your basic vinegar and water solution is really the perfect choice for cleaning most types of bare floors in your home. Mix up 1 cup vinegar with 1 gallon warm water (be sure it's warm!) and mop it onto a ceramic tile, linoleum, vinyl, or wood floor. There is no need to rinse afterward -- saving both time and water. If your vinyl or linoleum floor looks a little dull after cleaning, you can give it a shine by mopping it over again with straight club soda. Try not to saturate wood floors with the vinegar and water solution. Use a light touch; the mixture will make your floor shiny and remove any greasy buildup.
  3. Microwaves: To get your appliance lemony-fresh, she says, simply zap a bowl of water and lemon juice for five minutes. Let it cool, then open the door and wipe down the walls.
  4. Fresheners: For home made air fresheners simmer in a pot of water some cinnamon, orange peels, cloves or berries. My wife likes to place a small fan next to the stove and wow does the home smell fabulous.
  5. Drains: There ''ain't'' nothing like a smell y drain! You can clean and clear your drains by using 1 cup baking soda, 1 cup salt, and 1/4 cream of tartar mixed. Pour this mix into your drain and then pour in a pot of boiling water.
  6. Windows: Clean your windows with 4 tablespoons lemon juice mixed with a half gallon of water. Other effective cleaners for glass and mirrors are rubbing alcohol and witch hazel. Now I grew up watching my mom use newspapers to clean the windows. While this seems like a good idea, it isn't Earth Friendly. I suggest using an old tshirt that you can wash and reuse or a lint free rag.
  7. Stains on Vinyl: Use straight lemon juice to remove stains on vinyl items such as recliners or tile flooring.
  8. Furniture Polish: Mix 2 parts olive oil with 1 part lemon juice and apply it to your furniture using a soft cloth. Smells almost good enough to eat and wood loves it!
  9. To Get Rid of 'Heat' Marks on Wood: Make a thin paste of salad oil or lemon oil and salt. Wipe the paste on, then lightly buff the area as you wipe it off with a soft cloth.
  10. Shining Antiques, Metals, Etc: Use Salt & Vinegar plus Flour. Mix Equal parts to make a paste. Rub this onto the brass or copper you need shined. Let it dry for about an hour and then wipe clean with a soft cloth. Shines brilliantly! - You can also use a lemon slice dipped in salt. Rub your piece with this and then rinse and dry. - Last you can spray with undiluted vinegar then sprinkle with salt. Wipe thoroughly with sponge or cotton cloth removing all the salt so it doesn't turn green. Repeat twice. ( I don't like this one as much as the first two because of the vinegar smell)
  11. Fireplace: If you have a wood burning fireplace with yucky soot smudges use cream of tartar and water on them. Rub in, let dry, and scrub off.
  12. Another fireplace tip is putting a handful of salt into the fire itself. This will loosen soot in your stack and make the cleaning easier next time.
  13. These are just a few of our tips. There is a page where there are about a hundred more great 'concoctions' as the author calls them on Green Cleaning. You will find it here: http://www.geocities.com/Heartland/Prairie/8088/clngrn.html I highly suggest reading it if you are serious about going green!
  14. Last, replace disposable paper towels and sponges with rags. We like to use clean old socks!
Another tip about going green is choose a cleaning service who is a "Green" company! I have not researched any in our area as we clean our own home to save money so I can't recommend one oft hand. But, if you use a cleaning company be sure to inquire as to whether or not they would be willing to clean your home with Green Products. At the very least, perhaps they would use products you provide. In my estimation, if they want to keep your business they will do this for you.

A tip folks don't think of often is the importance of leaving your shoes at the door. If you only knew what all you treck in daily.... oil from pavement, animal wastes, pollen, dirt, and any number of other things, even lead! At our house we have a no shoes allowed policy and a doormat.
Well, hope those tips help. We are learning to be a Greener Family and you can too!

Be sure to read our "Green Foot Pledge" on our website www.archangelappliancerepair.com
There is a copy on our homepage and one on our About Us page.

Food for thought, ArchAngel

Tuesday, July 7, 2009

Refrigerator Buying Guide

Yet Another Remarkable Buying Guide from US Appliance. I couldn't have written it better myself!
Questions, send them to us on our new forums!
Visit Our Forums for DIY Questions & More
Food for thought,
ArchAngel

US Appliance Buying Guides
http://www.us-appliance.com/rebugu.html


There are many different types of refrigerators available today. Consider the differences between some of the most common types.


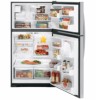
Top-Mount freezer refrigerators
A top-mount fridge has the freezer at eye level, with the fresh food compartment on the bottom. These fridges tend to have wider shelves in both the fridge and freezer sections. Traditionally this has been the most common type of refrigerator although some of the other styles are becoming very popular.
View our Top mount refrigerators

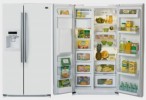
Side-by-side refrigerators
The refrigerator and freezer compartments are adjacent to one another and allow easy access to both compartments. Look carefully at the capacity and flexibility of the interior. In some models the shelves are narrower than those found in top or bottom-mount models, and may not accommodate larger items like bulky pizza boxes or gallon-sized containers. If possible select a model with adjustable bins and shelves so that you can customize the layout to suit your storage needs.
View our Side-by-Side refrigerators

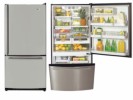
Freezer on Bottom
The bottom mount freezer is a good option for households that want fresh food selections at eye level. With the freezer at the bottom of the fridge, less energy is used to keep the section cold, and cooling is more consistent and even.
The configuration makes a lot of sense ergonomically, as well. Typically, the freezer is used less often than the fridge, and the most frequently used fridge sections are located in the top compartment for easy access.
View our Bottom-Mount refrigerators


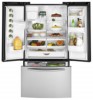
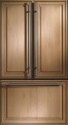
French Door
An increasingly popular style of refrigerator that has dual refrigerator doors and a pullout freezer drawer for convenient fresh and frozen food storage. This style combines the best features of the Bottom Mount and Side-by-Side refrigerators.
View our French Door refrigerators


Selecting a refrigerator that is the right size is important. If you buy one that is too big and don't keep it filled, it wastes energy and costs more to operate. If it is too small, you waste time constantly rearranging food trying to make it all fit.

Consider the capacity of your current refrigerator and how well it fits your groceries before you decide to increase or decrease the size of your model.
A good rule of thumb - Two people generally need between 16-20 cubic feet of fresh food storage and you should probably add an extra cubic foot for each additional person in your family.
Be sure to consider both your frozen and fresh food needs when selecting a particular model.


No matter if you just want a refrigerator that matches the rest of your kitchen or you want one that seamlessly blends with the rest of your interior the choices offered are varied.


Counter-depth Refrigerators
Refrigerators can often extend several inches past the cabinets in your kitchen but counter-depth refrigerators offer a more shallow profile designed to fit flush with your cabinetry and create a beautiful appearance.

Refrigerator Doors
Door may be contoured, hinges may be hidden to give an elegant contemporary look, or flat doors may offer a modern look.
Exterior Colors & Finishes
Many refrigerators come standard in colors such as black and white to match many decors. (Biscuit, another common color offered, is slowly losing popularity)
Stainless steel has also become very popular in refrigerators. Some manufacturers offer a stainless steel look at a lower cost. Sometimes referred to as 'clean steel' this finish resists fingerprints and is easy to maintain.
Refrigerator trim kits convert your free-standing refrigerator to a built-in look. The trim panel is either an aluminum or colored panel provided by the refrigerator manufacturer, or a panel is provided by your decorator, to exactly match the rest of your kitchen cabinetry.


Today's refrigerators offer a number of features and extras designed to make food storage accessible and flexible to your particular storage needs.

Think about how much shelf and bin space you use and the shapes and sizes of items you normally store. The ability to organize groceries and manage space is very important.


Door-mounted ice makers and water dispensers provide filtered water and ice on demand without requiring the door to be opened.
Clear shelves and door bins help you see what you have, no matter where it is in the refrigerator, and provide better access to items stored in the back.
Some models offer many options regarding where and how you can arrange your storage bins and shelves and store your food.
Adjustable glass shelves will provide greater storage flexibility as your needs change.
Spill-proof shelves capture spills and prevent them from leaking all over the refrigerator.
Fruit and vegetable crispers often feature adjustable humidity controls, and meat compartments may feature adjustable temperature controls.
Beverage compartments specifically to hold and dispense cans.
Wine racks.
Advanced lighting so that you can easily view fridge contents.
Dispenser child locks.
Ice storage bins.
Extra wide shelves.
Thawing/Defrosting capabilities.
Easy access slide out compartments and bins.
Dairy/Cheese/Butter/Meat compartments.

Make sure it will fit!
Measure the space that you have available for your refrigerator Know the height, width and depth of the area you want the new model to fit into.
Be sure to take into account the clearances you will need in your kitchen to open refrigerator doors to remove pans and shelves.
If you choose a refrigerator with an icemaker or ice and water dispenser, you will need to make sure you have access to a water line from behind the refrigerator for the water connections.


Efficiency
In a typical household the refrigerator can account for as much as 10 to 20 percent of total power you will use in one year.
New models that are ENERGY STAR® qualified certified are extremely efficient.
Refrigerators today typically use 30% less electricity than models built 10 years ago. For this reason, replacing an older refrigerator makes economical sense.

  • Alarm - A visual or audible notification or warning feature to notify an open door or power failure.
  • Bins - Storage areas designed primarily to keep meats, fruits and vegetables at optimum temperature levels.
  • Bottom Mount Freezer - Refrigerator type where the freezer section is located on the bottom of the unit, the refrigerator is on top.
  • Built-In - Appliance designed to be installed flush with the cabinetry
  • Capacity - The measurement of the interior of the appliance, usually in cubic feet.
  • Can Rack - Space-saving rack designed to stack canned beverages for automatic dispensing.
  • Crushed Ice - Feature that allows user to select crushed ice from the dispenser rather than ice cubes
  • Custom panels - Panels that can be fitted to a refrigerator to match your kitchen decor.
  • Dairy Storage - Compartment for storing cheese, butter or dairy products.
  • EnergyGuide Label - Estimated energy consumption on a scale showing a range for similar models. Estimated yearly operating cost based on the national average cost of electricity.
  • Freezer basket - A storage basket in the freezer compartment that can be pulled open on rollers or gliders.
  • Humidity Control - Available to control moisture levels or vegetable and fruit bins
  • Insulation - Material such as foam or fiberglass installed between the interior walls and the exterior of the refrigerator and freezer to keep cold air from escaping and improve the efficiency of the refrigerator.
  • Lock-out Feature - Common Water/Ice Dispenser feature to prevent children from dispensing water or ice without supervision
  • Manufacturer Warranty - Manufacturer’s specified time period after purchase covering product defects. Coverage may be for parts and labor or parts only.
  • Reversible Door - Door can be mounted to allow opening from right or left.
  • Shelves - Refrigerator shelving can be customized for large and small items.
  • Spill-proof shelves - Shelves have edges that prevent spills from dripping onto shelves below.
  • Side-by-Side - Refrigerator type where the refrigerator and freezer compartments are adjacent to one another and allow easy access to both compartments.
  • Top-Mount Freezer - Refrigerator type where the freezer compartment is on the top and the refrigerator on bottom.
  • Water Dispenser - A feature that dispenser water/ice usually through the door. Requires connection to a water source.